Tests and Trials: Milk Bread

It’s currently 3 something AM as I type this. Outside, the rain’s pouring, the thunder’s roaring, and the lightning’s illuminating the darkness in sporadic intervals. The atmosphere is wonderful. There’s a sense of isolation, as well as one of comfort. The temperamental weather recalls certain memories of being curled up under your duvet, of warm drinks, and of spooky stories told in the dark. There’s something so special about it. Of how the bad weather seems to give you permission to sulk. To wallow. To feel bad. And how’s that, me starting off a post about the weather again. But, you know, there’s no feeling quite like the one you get while shovelling down four freshly baked cookies during a thunderstorm. Ahh, that rush of unnecessary carbs and sugar. Who can resist chocolate chip cookies?

I digress. This post isn’t about cookies at all. That’s another post for another time, since I have all these photos that need posting and all this writing to do. Don’t worry. I’ll spend that time perfecting the cookie recipe. Speaking of perfecting recipes, perfection doesn’t come without attempts and failure. I spend a good portion of my time coming up with recipes. Which is quite the shocker, because that requires some calculation, which equates to maths, which I really do not like. Emphasis on really. Yet there’s something oddly enjoyable about working with fractions and percentages when it comes to baking. Numbers are fiddly things. Confusing, too. You know when you ask your brain something and it has the answer? But you’re not sure how you knew that or whether to trust it? That happens to me a lot. Like with a calculation error regarding this recipe. Not quite a calculation error, if we’re being exact. More like a conversion error. An error of ratio.

Numbers are fiddly things. Confusing, too. You know when you ask your brain something and it has the answer? But you’re not sure how you knew that or whether to trust it? That happens to me a lot. Like with a calculation error regarding this recipe. Not quite a calculation error, if we’re being exact. More like a conversion error. An error of ratio. Since then, I’ve learned to question anything that my brain comes up with. I’ll tell you a little story. I got locked in a park three days ago. At approximately midnight. For two hours. It was not pleasant, as I’m sure you can conclude on your own. As for how I ended up in that situation, it’s quite simple. I did not read the sign. Why? Before then, I’d puzzle over the opening and closing hours of that park area, and somehow came up with the opening time of 5:30 AM to 11:00 PM. So I looked around the park the next time I went, but couldn’t find where I read that, or from where I gleaned that from. Of course, the only logical thing to do was to conclude that there weren’t any opening or closing hours. Because I’m a very logical person. As I’m sure you can tell. (Not.) And that’s how they locked up the gates at midnight as I was running 5K. My sister had a fair point, though. She asked (rhetorically, I’m assuming) “who goes out running at midnight?” The answer is simple, dear sister. Me.

Back to the main topic of this post. The recipe. The partially successful loaf. Let me say that it wasn’t a major fail. It was edible, it wasn’t burnt, nor was it horribly misshapen. But the flavour was off. That’s what I got for using reconstituted milk. I’m not blaming the milk powder. No, it’s wonderful, for being an alternative to easily spoilt fresh milk. For baking. I’m not sure if reconstituted lukewarm milk is appetizing. I’m guessing not. Anyways, because I’m me, with my malfunctioning brain, I turned to the internet for the ratio of powder to water. Instead of checking the actual cannister. Moral of the story? Don’t be like me. The ‘locked in a park at midnight’ story should back that up. That’s a bit misleading, actually, since the internet wasn’t wrong. I muddled it up again. I remembered the ratio incorrectly, and so I put way too much powder. Or maybe I wanted a milkier bread. It’s blurry to present me. All I know is that past me screwed some things up, but did it for the greater good. Learn from my mistakes, people.

It’s safe to say I won’t be posting the recipe in this post. I’ll never post that exact recipe. But once I edit it and fix it, I just might. I do, however, have a lot of photos to post. Prepare yourself.

20150330_113712

20150330_114041

20150330_114640

20150330_114643

20150330_114709

20150330_121729

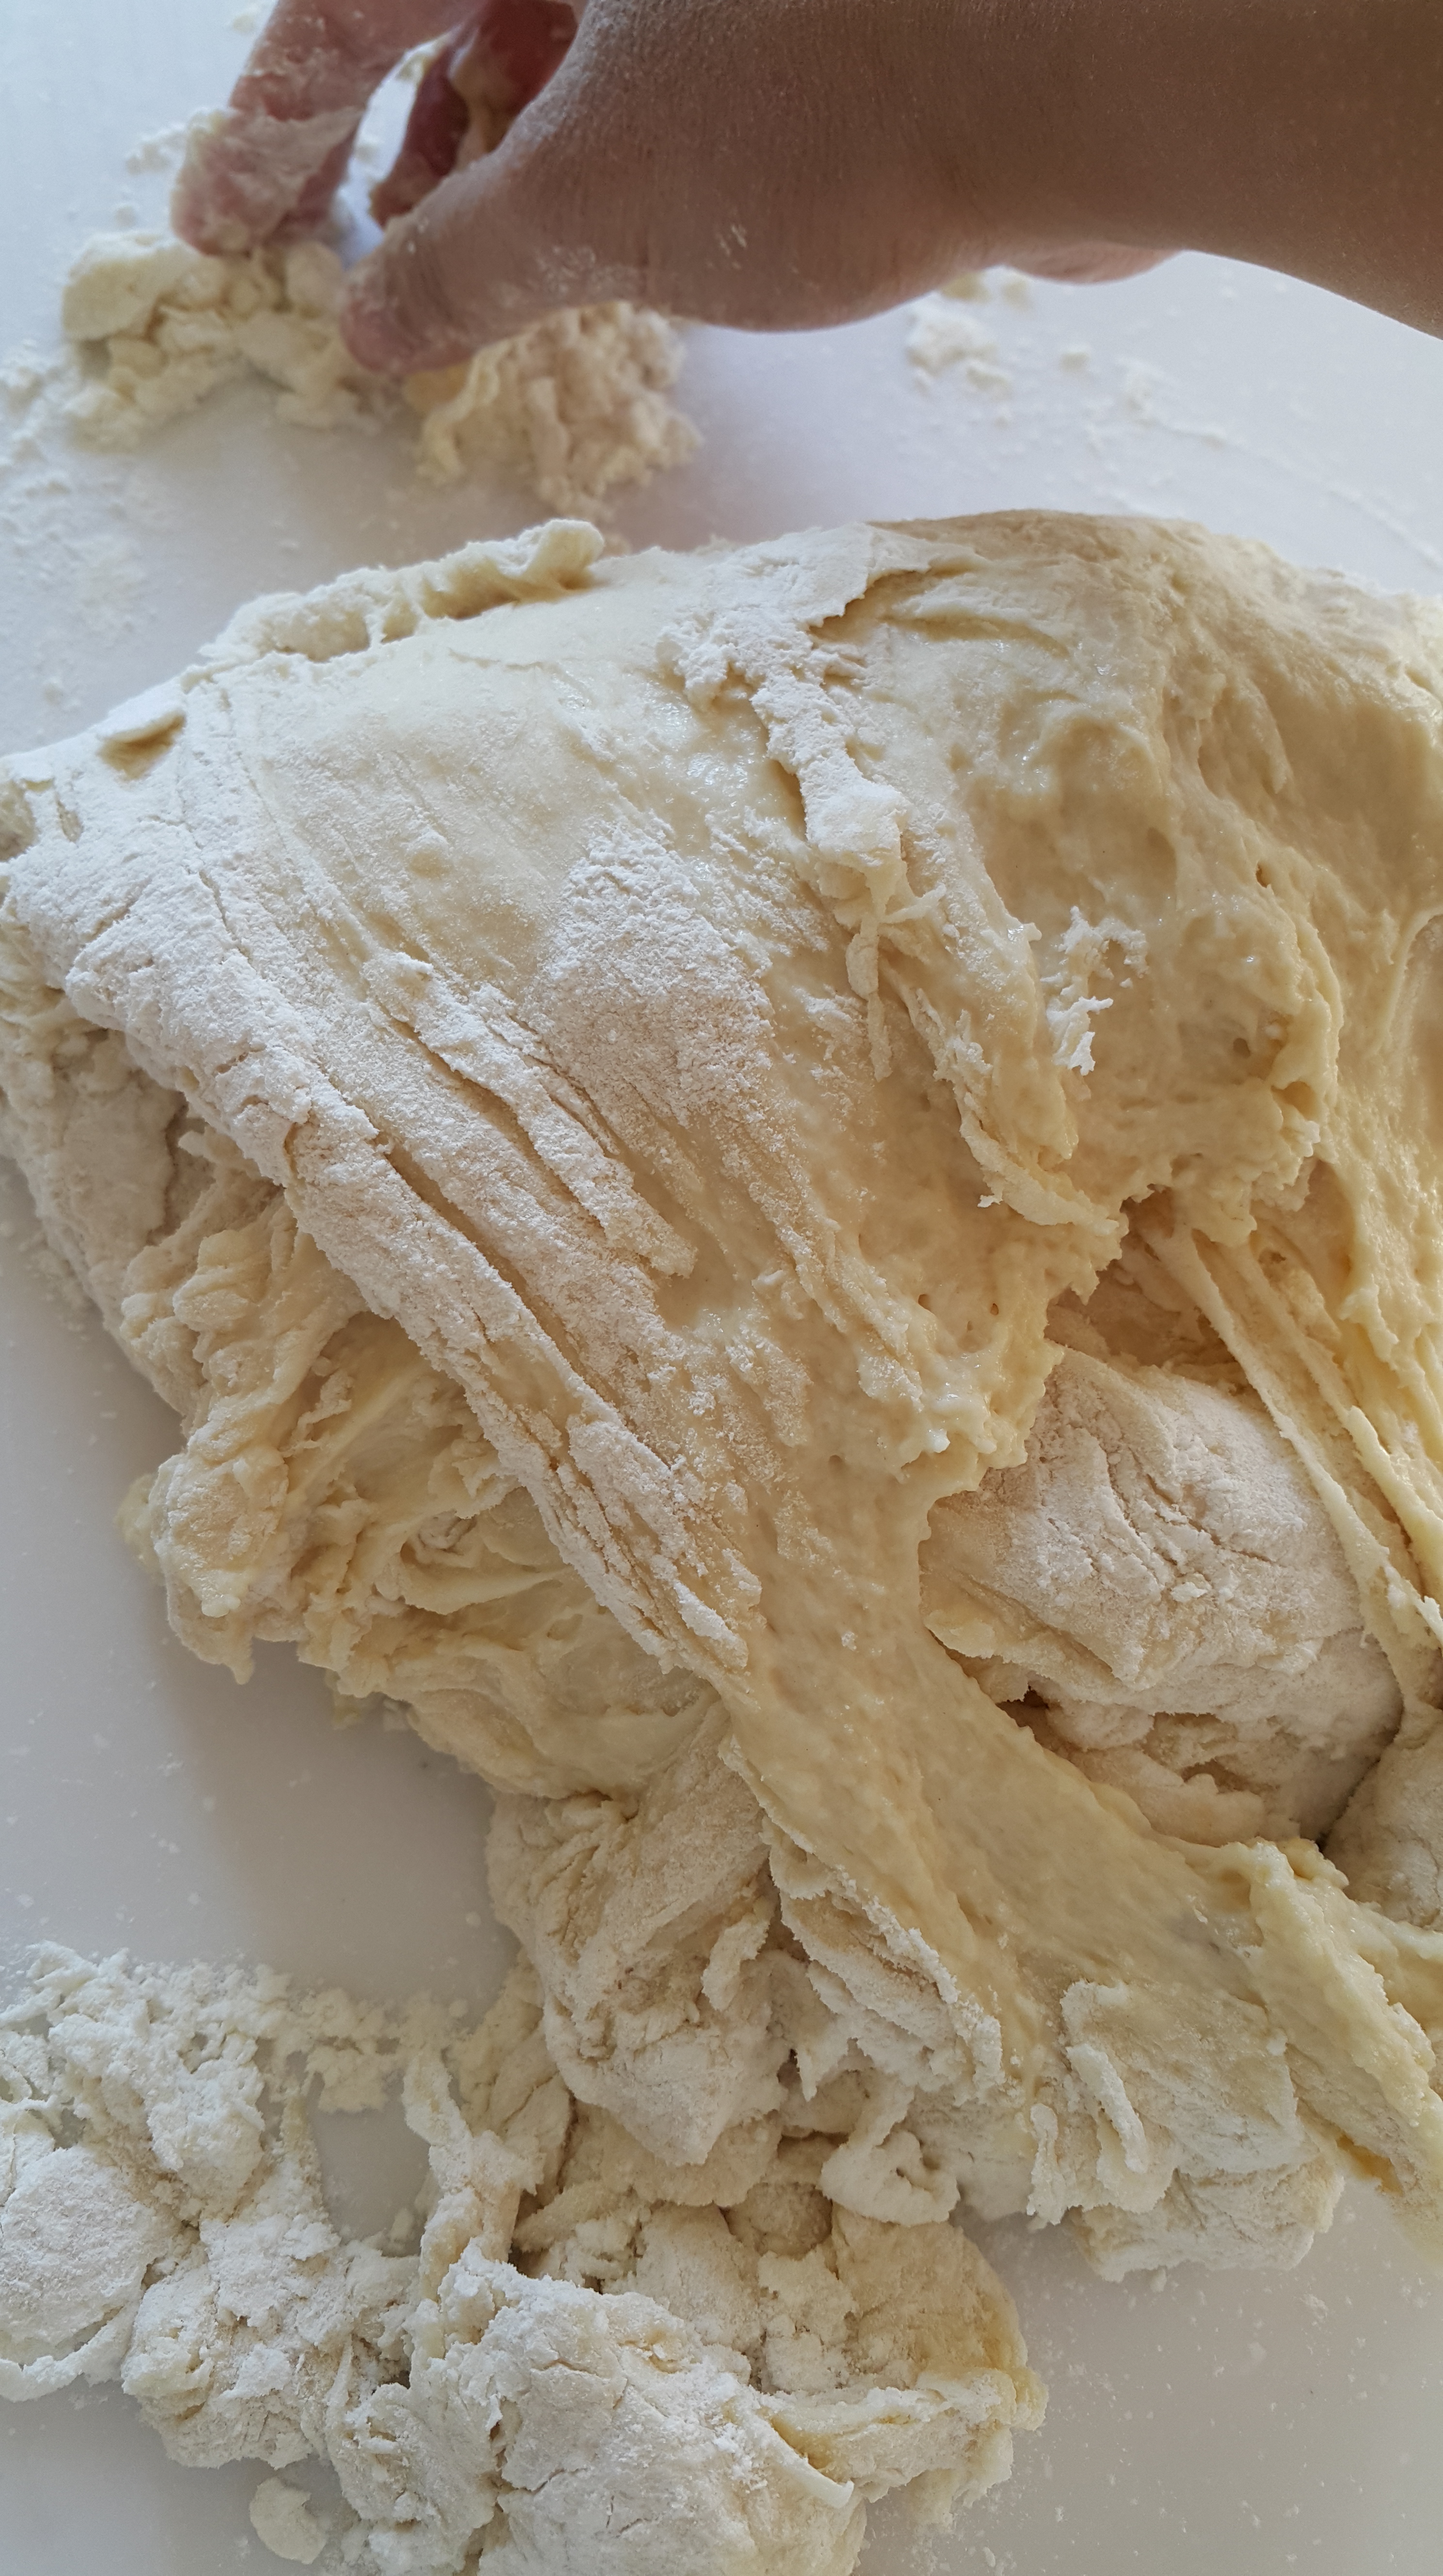
Bread doughs are cuter than babies. Argue all you want, I’ll stand by my opinion. Also, what’s up with the whole comparison of kneaded dough to a baby’s butt? Are baby butts really that smooth? What about diaper rash? I really don’t want to feel a baby’s butt just to quench my curiosity. For (hopefully) obvious reasons. I also don’t know why I decided to bring that up.

20150330_132548

20150330_132558

It kneads a good punch.

20150330_133744

20150330_134913

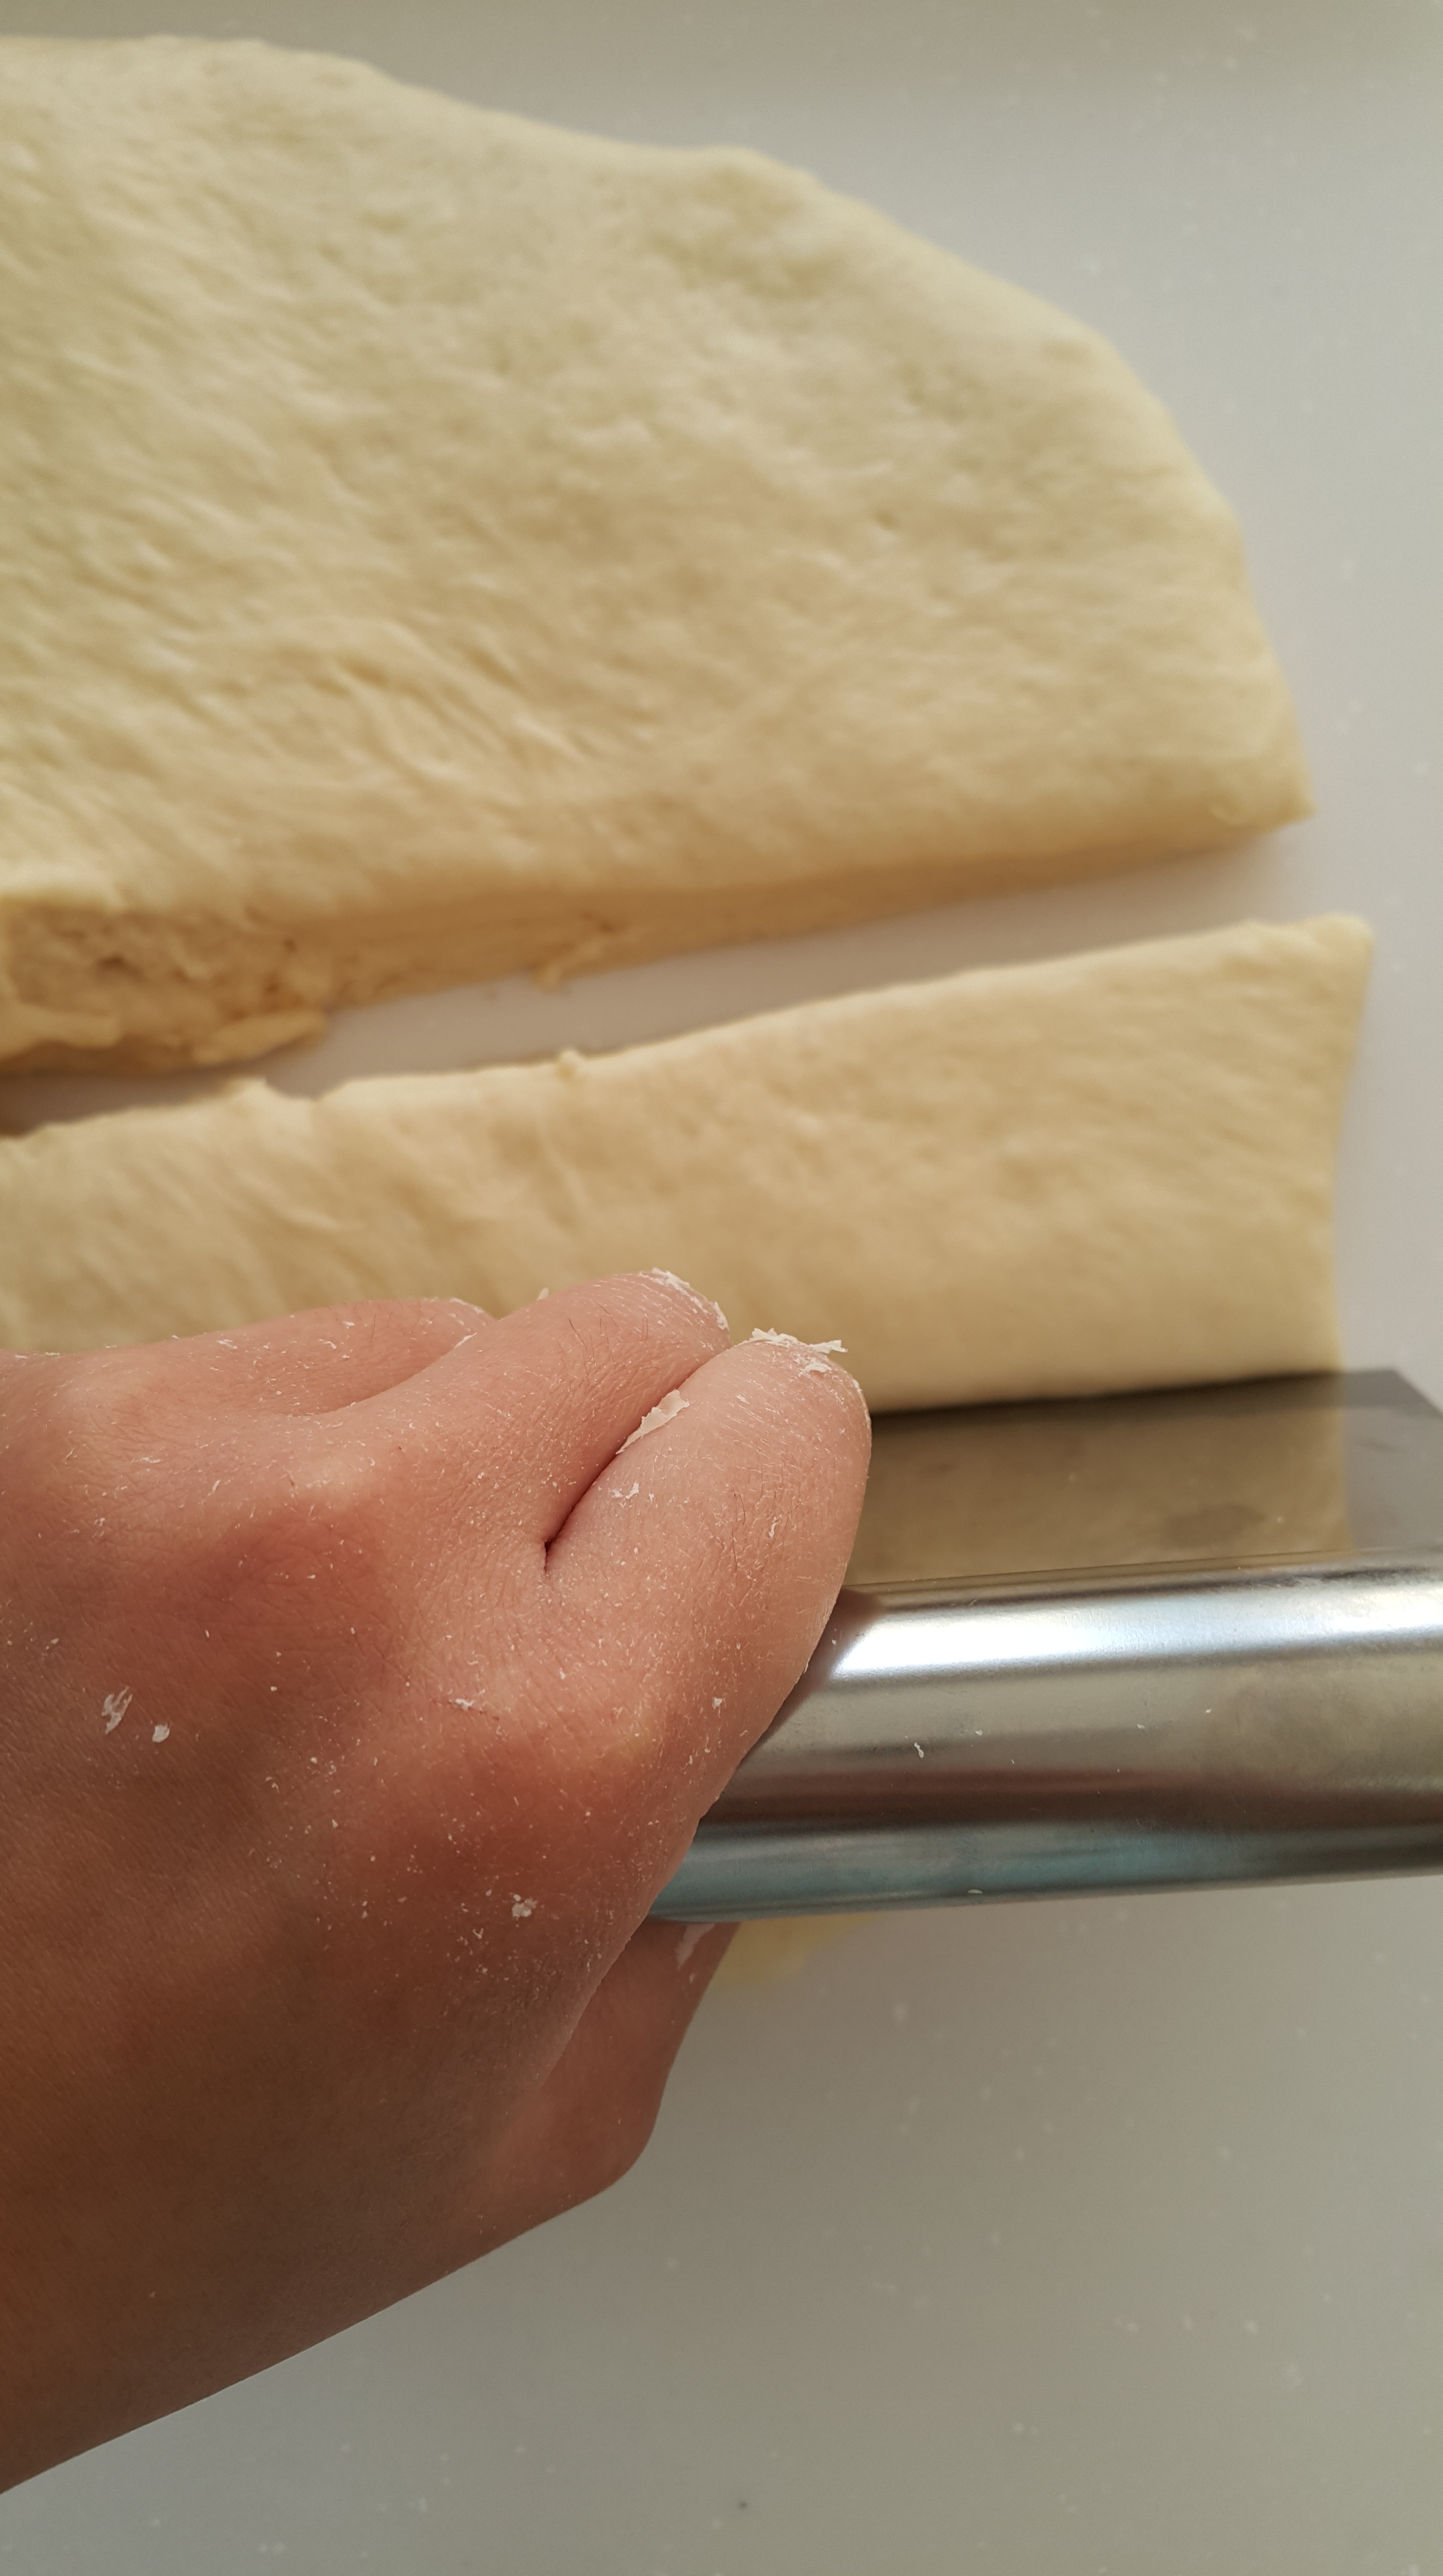
Parchment paper is so useful. Even that’s an understatement.

20150330_135423

20150330_135528

20150330_145747

Here’s an issue I have with breads made with milk. The milk seems to interfere with the gluten somehow. Or impedes with gluten development. I’ve heard of an enzyme in milk which breaks down gluten, but that’s supposedly killed off at a certain temperature, which UHT milk is heated to. But it still happened when I used UHT milk. I’m wondering if it’s something to do with the fat content, or maybe even the proteins. The problem is not dough strength. I do think there’s plenty of gluten. The problem is the extensibility of the dough. It’s evident in the tears you can see on the surface. The thing that baffles me even further is that when I use an egg, I don’t have that problem. Even if all the liquid I’m using is milk. Perhaps it’s a hydration issue.

20150330_150025

All breads are beautiful.

20150330_153638

Come to mama, baby’s butt!

I’m sorry I said that. I am in no way ready for the responsibility of being a parent.

20150330_153700

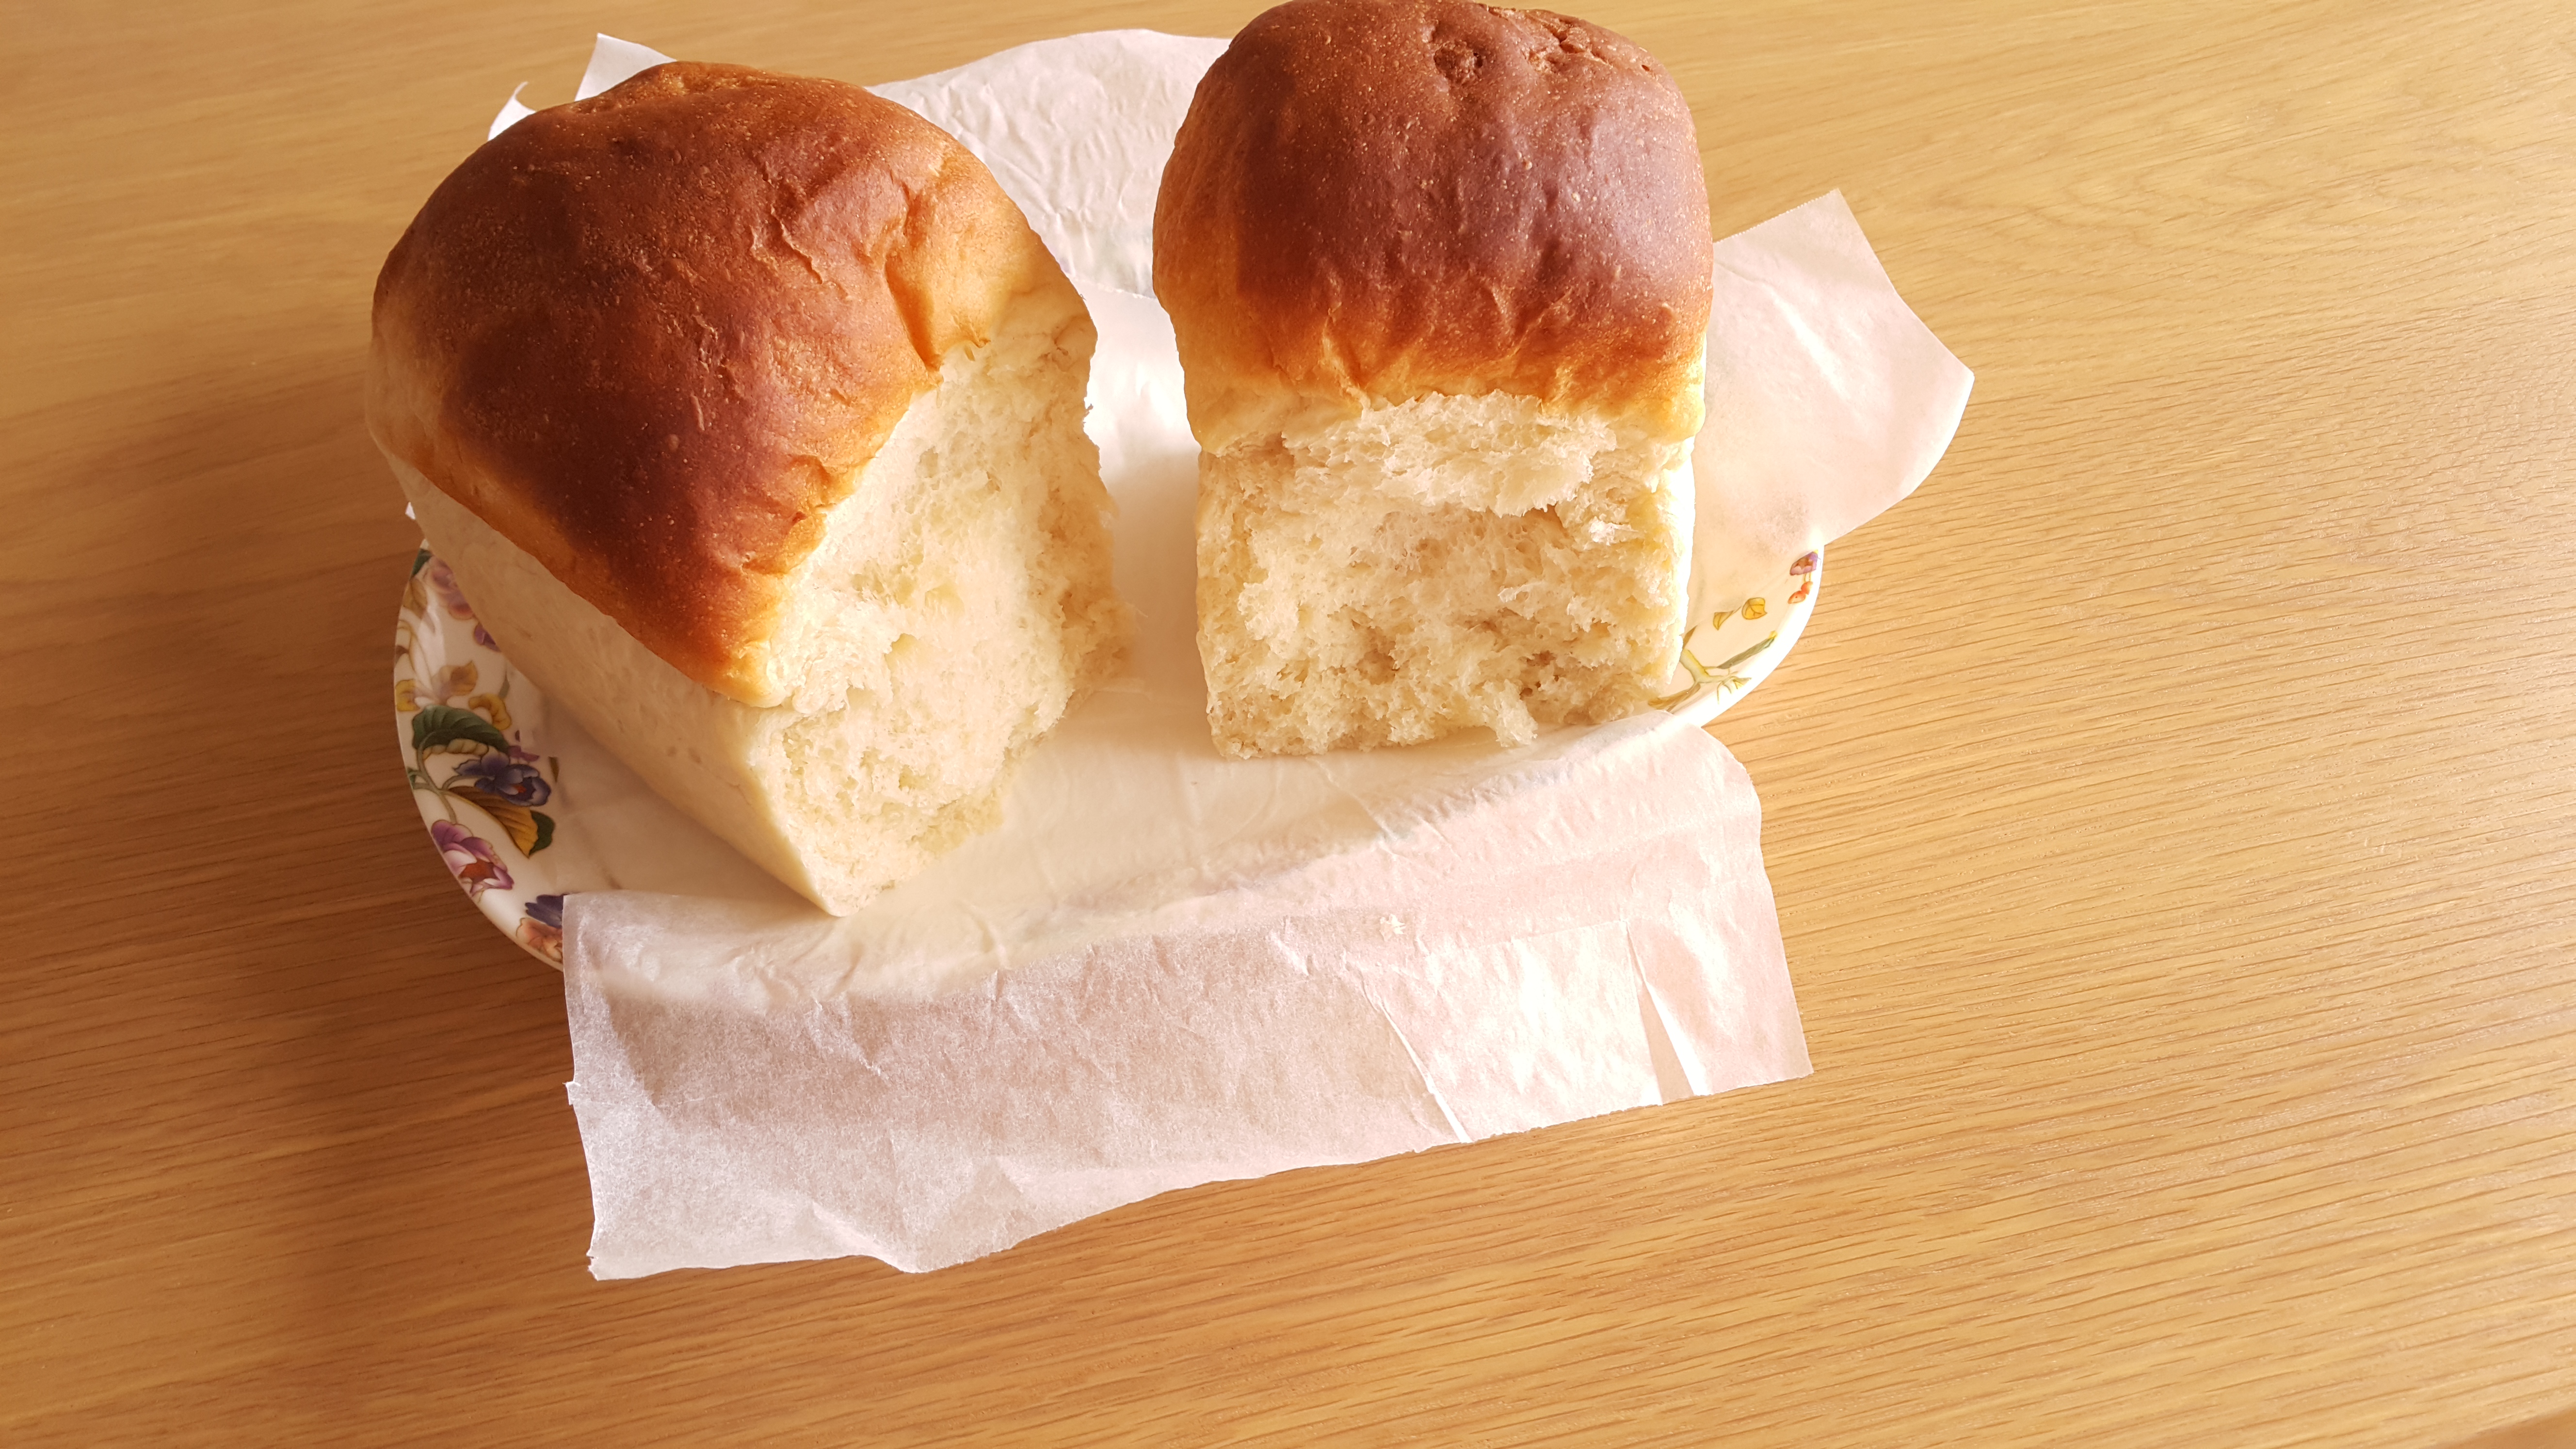
Notice the dark top crust? That’s the result of a high percentage of sugar in the dough.

20150330_153800

20150330_153816

20150330_154237

20150330_154517

Oh, Japanese milk bread… how I aspire to make you. One day I shall reach that elusive standard.

20150331_083303

20150331_083344

20150331_083447

20150331_083514

20150331_083846

Torn end vs cut end.

20150331_083857

Just so you know, too much milk powder results in a cheesy flavour.

20150331_083905

In case you ever need that information.

20150331_083938

20150331_083947

If you’ve reached this point, thanks for tolerating me and my nonsense.

Golden Submarines


20141220_133530-1

Before the long text, here’s the recipe:


GOLDEN DOUGH

3 cups bread flour

About 3 cups AP flour, give or take

1 cup water (warm, but not too warm. About body temperature)

1 cup milk (or 1 cup water + 1/4 cup powdered milk)

1 egg

1 tbsp + 3/4 tsp yeast

1 tsp salt

1/2 cup sugar

1/4 cup softened butter


METHOD 

(The long method’s below, so read ahead if you want a step-by-step tutorial with photos)

  1. Proof your yeast. Do this by pouring the 1 cup of water into a bowl, and sprinkling the yeast over. Let that sit for about 5-10 minutes or until bubbly and foamy.
  2. Add in the egg, sugar, milk, and salt, and give that a good stir. Start add your flour in, a bit at a time.
  3. Add one increment of flour and mix until well combined. Keep doing that until the dough cannot be stirred, then turn it out onto a work surface. You can keep adding flour while you knead if the dough kneads (ha) it.
  4. After kneading until the dough is no longer sticky and is elastic, smear the butter all over it, and knead to incorporate. This will take a while so be patient. The dough will get weird and ropey.
  5. Shape the dough into a ball and place it in another bowl. Cover, and let it rise until doubled or so, about an hour. When it’s risen, punch it down, transfer it to your work surface, and knead a couple of times to get the excess gas out.
  6. You can now shape the dough any way you want. If you want to see how to shape sub rolls, just scroll down for the long post. Place your shaped dough on a parchment-lined baking sheet (or you can grease/flour/do whatever it) and cover. Leave them to rise until very puffy and doubled, about an hour.
  7. Preheat your oven to 180C. After they’ve completed their final rising, put the dough in the oven for 25-30 minutes. Oh, and a note, if you want to glaze the dough with an egg wash, do it after the last rising. Simply beat one egg with a little water and brush that (gently) on to the dough. So back to the baking. If the bread gets a little too dark just tent it with foil. Bake until it’s a deep golden colour, which I will say is golden brown.
  8. That’s it! Be sure to enjoy.


No sane person would, after a night of no sleep, start baking at 8 in the morning. Which brings me to two conclusions- one, I’m probably not sane, and two, my reasoning is skewed. But hey, if you’re up early, you might as well make the best of the situation. And by situation I mean lighting, just so I didn’t have to chase daylight later on. Don’t worry, you don’t have to get up and bake at 8, unless you’re out of your mind and slightly obsessed with taking photos.

I have to say that the weather today was a refreshing change. There was actually sunlight (shock!) which was a form of salvation from the biting cold. The sky had colour to it, which may not sound like much to you, but actually is, since it’s a drastic change from the bleached white it was. Seriously. It looked like paper yesterday.

But what better way to spend a winter’s day than to bake? I’m sorry I spent a paragraph talking about the weather. I’m awfully boring and easily distracted that way. You see, I hate the cold with a burning passion. Ironic description but please bear with me. Sometimes a blanket’s not enough. And when your bathrobe starts giving you static shocks (please tell me I’m not alone), you need another source of warmth. Sure, you could take a hot shower, but there’s no fun in that. Okay, there is. Never mind. Have I mentioned I got no sleep last night?

You know what’s bliss? Standing in front of the oven for longer than you care to admit. Coupled with the luscious scent of whatever you’ve got baking. It makes you feel like you’re wrapped up in a duvet of caramel. From that, I’ve deduced that you can indeed sleep while you’re standing and still awake. From that, I’ve deduced that I make absolutely no sense.

It’s my opinion that bread smells the best when baking. Brownies come a close second, but bread has to be the boss here. There’s something so cozy and homely about that buttery, yeasty aroma. Perhaps even something nostalgic.

So when my sister requested I make submarine rolls, I was elated, and almost… proud, in her very wise decision. For the rolls I used a lightly enriched dough recipe. What makes it so scrumptious is the butter. Do not be afraid of butter. Butter is your friend. Butter is better.

Let’s get on with it then.

Start by sprinkling your yeast into the water. Let it sit until foamy or freaky. As a general rule for yeast, the freakier the better.

20141220_081824

Now, I got impatient and as I knew my yeast wasn’t dead, I didn’t wait for very long. So as you can see there isn’t much freakiness going on.

20141220_082447

Add the salt, milk powder (if using), and sugar. Give that a stir then add the other liquids…

20141220_082719

20141220_082842

…and give that a good stir!

Then mix in the flour, a cup or so at a time. Take your time with this.

20141220_083102

20141220_083258

Keep adding in the flour.

20141220_083735

Stir it…

20141220_083758

Mix the flour in well…

20141220_084202

And it’ll become doughy!

20141220_084426

We’re not quite there yet, so in goes more flour. I think I added about 5 cups by that point.

20141220_084507

When you’ve added enough flour, and you’ll know this when you can’t stir the dough anymore, turn it out onto a clean surface.

20141220_084753

Do remember that when it comes to bread, it’s better to err on the side of too wet rather than too dry. You can always add more flour but you can’t take it away.

20141220_084838

20141220_084956

20141220_085015

I don’t suggest you flour your work surface.

20141220_085355

Of course I’ll be all lumpy and bumpy and craggy and shaggy. But isn’t it beautiful?

20141220_085505

Here’s the part people tend to dread the most: kneading. I promise you it’s not overexerting or complicated. Really. The mistake most people make in the beginning, myself included, is adding too much flour. The thing is, the dough is supposed to be sticky when you start kneading. Not tacky- sticky. Not so sticky that you can’t move it, of course, but it should cling to your hands. Here. I’ll show you.

20141220_085743

You can knead the traditional way, which is to simply fold the dough over, then turning it 90 degrees, pushing it forward with the heel of your hand, and repeating.

20141220_085754

Perfectly sticky.

20141220_085801

20141220_085812

Gather up all the loose pieces of dough as you go along. Try to limit wastage!

20141220_085836

I’ll teach you another kneading technique which has approximately 1837483 different names. Nah, of course it’s not that many- it’s more like 1837482. Call it whatever you want. Some call it the french kneading technique. Some call it air kneading. Some call it slap and fold. I personally like air kneading the best, because it sounds like you can bend elements or something. Trippy.

20141220_085923

Grab one side of the dough and pull it up. So now you’re holding and dangling the dough, got it? Good. Now slap the dough down on your work surface. Gee, I wonder why it’s called the slap and fold technique. Wherever did that slap come from? Aaand bring the bottom of the dough over to the top, basically folding it. Well done, you’ve just completed a form of air bending. Not really. But I guess you can call it dough bending.

20141220_090529

Pull it up…

20141220_090541

Slap it down. The louder the slap, the more you’ll scare your sister. But I digress.

20141220_090546

Then just fold over. The dough, through its natural momentum, will probably roll forward by itself. Even if only a little. It’s eager, you see.

20141220_090551
Breathe if you think my thumb looks like an old man’s forehead.

20141220_090558

Repeat.

20141220_090602

20141220_090609

20141220_090621

20141220_090705

Have fun with the kneading. It’s a great stress reliever. Shape the dough into your enemy’s face and punch it. Do whatever. Kneading is to develop the gluten in the dough- you can do that by working the dough in any way, by stretching, pulling, rolling… There is no set way to knead.

20141220_092116

There we go. Much smoother. It’s not fully kneaded yet, there’s still the butter to add. The reason we add the butter after kneading the dough for a bit, is so we give the gluten a chance to develop first, before the fat interferes with the gluten strands.  A nifty trick.

20141220_092414-1

Look, modern art! Not really. The sunlight decided to coddle the butter in its very own spotlight. Notice my very precise measurement of butter. Don’t be like me. Since it’s winter, I had to soften the butter in the microwave for a bit.

20141220_092741

Butter up your unbaked bread. You’re still buttering bread, but it’s just in a different state. Enjoy this part a lot. Perhaps way too much, but hey, I’ll be the last person to judge you. Then go ahead and wonder why butter smells so divine.

At this point you want to knead until the butter is fully incorporated. It’s difficult. The dough will act weird and become all mushy, then ropey, but keep persevering and you’ll be rewarded with a smooth mass you’ll feel the urge to poke. The butter will make odd noises, and you’ll laugh if you’re like me, before you realise you’re laughing at butter.

Normally I use the windowpane test to test if a dough is kneaded enough. You don’t knead (did I just…) that here. If it’s smooth, elastic, soft, and pliable, then it’s done. It shouldn’t be overly sticky or dry but tacky.

20141220_094841

Shape it into a ball, plop it into a bowl, cover, and try hard to ignore it for the next hour or so. It’s gotta rise. Note that rising times will vary depending on a few factors, but mainly temperature. The hotter it is, the faster it’ll rise. And so… how do you tell when it’s finished rising?

Simple. Poke it.

20141220_104943

If the indent stays and doesn’t fill in, it’s ready! Get out your fist…

20141220_105001

And really go for it.

20141220_105044

Ahhh… hear that? It’s the sound of air escaping and your tension melting.

20141220_105111

Yes, this’ll happen, but it’s not much of a problem.

20141220_105201

Take a moment to appreciate the giant bubbles. Then turn out the dough, and knead for a little bit to get out that gas.

20141220_105454

20141220_105504

20141220_105543

That’s more like it. Now roll it into a rectangle. It doesn’t have to be perfect.

20141220_105647

20141220_105658-1

20141220_105850

I wanted fairly large rolls, so I made 8 buns out of this batch. You can do it any way you like, but I’m going to show how I shaped the rolls. This is how I split the dough into 8. You can weigh the dough instead, but I didn’t do that as I didn’t want too much fuss.

Cut the dough in half. A bench scraper is handy at this point, but any sharp tool will do fine.

20141220_110058

20141220_110116

20141220_110143

Then cut the two halves into half. So you should end up with four pieces.

20141220_110213

20141220_110240

20141220_110301

20141220_110322

Then cut the four pieces in half.

20141220_110336

20141220_110422

20141220_110441

20141220_110451

20141220_110628

As for how to shape the dough into rolls, first take a piece, and round it into a ball.

20141220_110737-1

20141220_111242

Roll that out into an oval, and starting from the long side, roll it up like a swiss roll. Pinch the seam to seal. Tuck in the ends and pinch to seal.

20141220_111102

20141220_111343

20141220_111354

Ta da! A doughy submarine. Arrange the rolls on a baking sheet, which can be lined with parchment paper, greased, or floured well.

20141220_112533

20141220_111953-1

20141220_111833

Cover, and leave to rise until doubled or more. This takes about an hour. Preheat your oven to 180C somewhere around this point.

20141220_113105

When they’re ready to bake, prepare the egg wash. Crack an egg into a bowl or something and beat it with a little water.

20141220_123202

20141220_123406

Using a pastry brush, carefully brush the egg wash onto the buns. You don’t want to skimp on the egg wash. Double or triple coat the dough, if you must.

20141220_123646

20141220_123656-1

Try not to let the egg wash drip onto the sheet.

20141220_123700-1

The egg wash is, after all, meant for the dough only.

20141220_123706-1

Keep a light touch- you don’t want to deflate the dough!

20141220_123714-1

20141220_123719-1

20141220_123755

This process is oddly calming and mesmerising. Maybe it’s the focus required that does it.

20141220_123825

20141220_124041

Ready to experience heaven? Put them in the oven and in 25-30 minutes, you’ll have a beautiful tray of golden fluff. Meanwhile, the house will smell like bread. Which is a great thing by the way. Stand in front of the oven if you’re cold- trust me, it’s one of the best sensations ever. Oh, and the smell that hits you when you open the oven door… a rich, buttery scent that is reminiscent of caramel. Yeasty. Perfectly yeasty. Let’s just say that if this scent was made into a perfume, I’d wear it everyday.

If the rolls get too brown, just tent them with foil. When they’re a deep golden, they’re done.

Are you ready? You butter be.

20141220_132955

Irresistible. Plain goodness. Simple but oh-so delectable. And oh my, that blissful smell…

20141220_133141-1-1

20141220_133303-1

20141220_133554-1

20141220_133607-1

20141220_133647-1

Inside? Inside is the stuff angels eat. I think.

20141220_133934-1

20141220_134105

20141220_134139-1

20141220_134216-1

20141220_134248-1

20141220_134253-1

20141220_134313-1

20141220_134351-1

20141220_134746

20141220_134916

20141220_134935

Is that enough to get you to make it yourself?

Enjoy. Enjoy it warm, or cold, or toasted, or slathered with butter. Or just tear into it. It’s all good.